The full guide
Instagram image sizes in 2026, and how to resize without losing quality
Instagram is forgiving about what you upload and strict about what it shows. It accepts almost any photo, then crops, scales and compresses it to fit the place it appears.
Instagram is forgiving about what you upload and strict about what it shows. It accepts almost any photo, then crops, scales and compresses it to fit the place it appears. If you hand it an image at the exact size and shape it wants, you decide what stays in the frame and you skip a round of scaling that softens detail. This guide lists the sizes for every format, explains how the feed and the profile grid crop each one, and shows how to resize a photo in your browser with a focus point so the right part stays in view.
Every Instagram size at a glance
Instagram works at 1080 pixels wide for posts, stories and reels.
| Format | Size | Shape | Notes |
|---|---|---|---|
| Square post | 1080 by 1080 px | 1:1 | Loses its sides in the 3:4 profile grid |
| Portrait post | 1080 by 1350 px | 4:5 | The tallest feed post; the best default |
| Landscape post | 1080 by 566 px | 1.91:1 | Small in the feed, a sliver in the grid |
| Story or reel | 1080 by 1920 px | 9:16 | Full screen; keep text out of the top and bottom bands |
| Profile photo | 320 by 320 px or larger | 1:1, shown round | Upload larger, such as 1080, for a sharp picture |
The feed shows posts between 1.91:1 and 4:5. A taller or wider photo is cropped to fit those limits, which is why resizing it yourself first lets you choose what is kept.
Why 4:5 is the best default
A portrait 4:5 post takes the most room in the feed of any post shape, so it gets more of the screen as people scroll. It also loses the least in the profile grid, which shows posts at 3:4: about six percent from the sides, against a quarter for a square post. If you are not sure which shape to use, use 4:5.
Fill and crop, or fit on a background
There are two ways to bring a photo into a new shape.
Fill and crop
The photo is scaled until it fills the whole frame, and the parts outside are cut away. Nothing in the frame is empty. With a focus point you decide which part stays: slide left or right, up or down, until the subject is where you want it. This is the right choice for most photos.
Fit with a background
The whole photo is kept and placed in the middle of the frame, and the empty space around it is filled with a color. It is useful for designs, screenshots and product shots where nothing may be cut, and for putting a landscape photo into a story without losing its edges. Pick a background color from your brand or from the photo itself; the Color Palette from Image tool can suggest one.
Stories and reels: the bands to keep clear
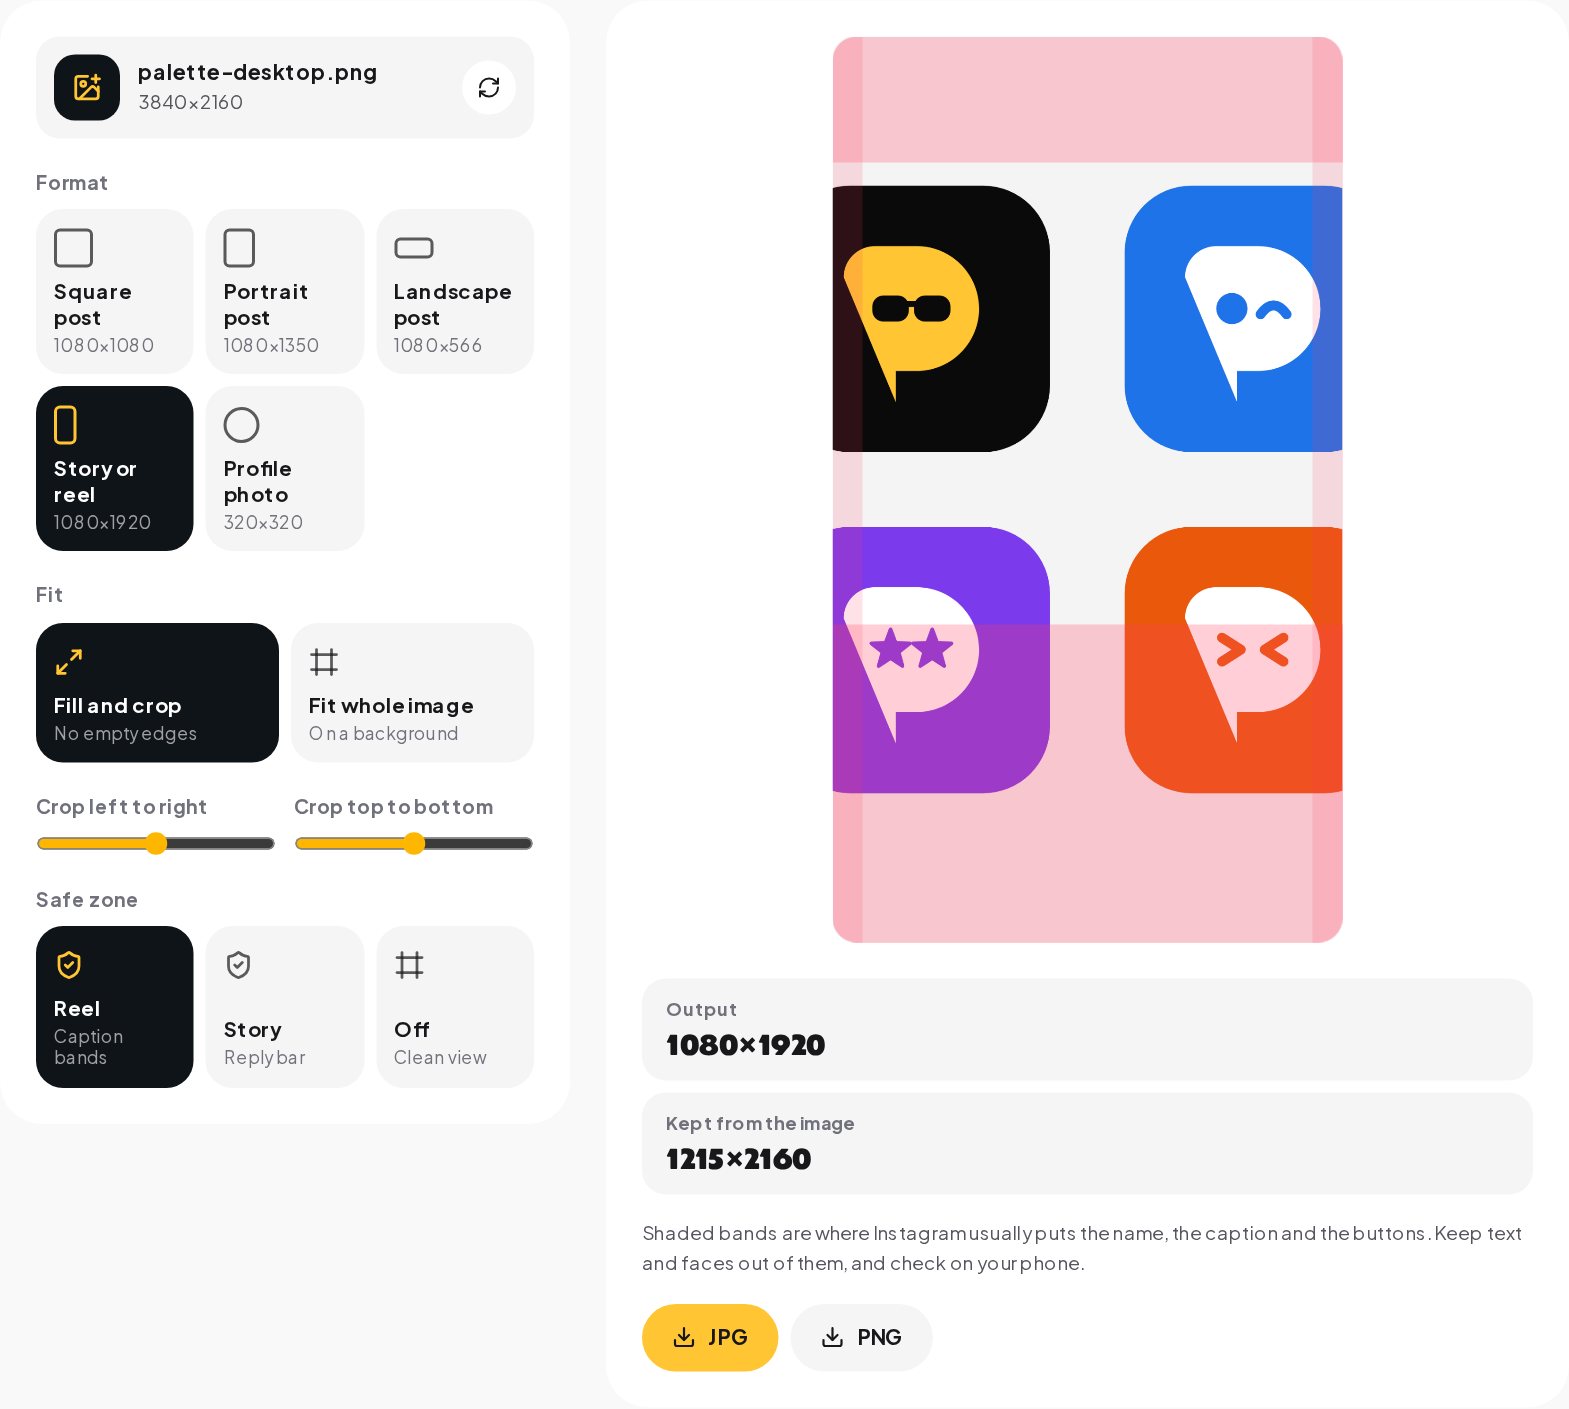
At 1080 by 1920, stories and reels are full screen, and the app's interface sits on top of them: the profile and progress bar at the top, the reply field or the caption and buttons at the bottom. The resizer shades the bands where these usually sit when you choose the story format.
| Format | Top band | Bottom band | Sides |
|---|---|---|---|
| Reel | About 14% | About 35% | About 6% |
| Story | About 14% | About 20% | About 6% |
Neither format has an official fixed figure for organic posts; these are cautious guides. For a closer look with the actual app layouts, including TikTok, use the Safe Zone Checker.
Resizing a photo in a minute
- Open the Image Resizer and choose a photo. It opens in your browser and is never uploaded.
- Pick the format: square, portrait, landscape, story or reel, or profile photo.
- Choose fill and crop with the focus sliders, or fit the whole image on a background color.
- For stories and reels, switch the safe zone shading to reel or story to see the bands.
- Download a JPG for photos or a PNG for designs with text.
If the photo is smaller than the format, the tool tells you it will be enlarged and may look soft. Start from the largest version of the photo you have.
JPG or PNG
- JPG for photos. It keeps files small and Instagram converts uploads to JPG anyway.
- PNG for designs with text, logos or flat colors, where JPG compression can leave smudges around sharp edges. Instagram will still compress it, but it starts from a clean file.
Keeping images sharp after upload
- Export at the exact size. An image that does not need scaling loses less detail.
- Start large. A source at least as big as the format avoids enlargement.
- Upload on Wi-Fi when you can, and turn on Instagram's setting for uploading at the highest quality.
- Avoid tiny text. Compression blurs fine lines first; use bold type.
- Do not edit and re-save the same JPG many times. Each save loses a little detail. Keep the original and export once.
Why photos look blurry on Instagram
Most blurry uploads come from one of a handful of causes.
- The upload was scaled twice. A photo at an odd size is scaled by your phone's share sheet and again by Instagram. Export at the exact size once.
- The source was small. A screenshot or a photo saved from a chat is often a fraction of the original resolution. Use the original file.
- Mobile data. Uploads on a weak connection can be sent at lower quality. Upload on Wi-Fi when the photo matters.
- Too much sharpening or noise. Heavy filters and dark, noisy photos lose detail in compression. Edit gently and brighten dark photos.
- Fine text and patterns. Thin lines and tight patterns blur first. Make text bold and large.
Sizes for the other places your images go
The same image often ends up on several apps. These sizes cover the common feeds.
| Place | Size that works | Shape |
|---|---|---|
| Instagram and Facebook feed | 1080 by 1350 px | 4:5 |
| Stories and Reels covers | 1080 by 1920 px | 9:16 |
| TikTok photo posts | 1080 by 1920 px | 9:16 |
| WhatsApp status | 1080 by 1920 px | 9:16 |
| Square, any feed | 1080 by 1080 px | 1:1 |
When one image has to serve several places, design it at 4:5 with the important part in the middle; it can then be cropped to square or placed on a 9:16 background without losing anything that matters.
Common mistakes
- Square posts in a 3:4 grid. A quarter of the width disappears on your profile. Prefer 4:5.
- Landscape photos in the feed. They are small in the feed and tiny in the grid. Crop them to 4:5 or use them inside a carousel.
- Text near the edges of a story. The interface covers it. Keep text in the middle.
- A small profile photo. Upload a large square so it stays sharp on the profile page.
- Wide panoramas squeezed into one post. Split them into a seamless carousel with the Carousel Splitter instead.
From a good-looking post to a conversation
A post at the right size gets more of the screen and more attention, and attention turns into comments and DMs. ChatinFlow's Instagram automation replies to each comment with a DM and answers common questions in the inbox, so the people a good post brings in get an answer while they are still interested.
Quick answers
What is the best Instagram post size in 2026?
1080 by 1350 pixels, portrait 4:5. It takes the most room in the feed and loses the least in the profile grid.
What happens if I upload a photo wider than 1080 pixels?
Instagram scales it down to 1080 pixels wide. A photo narrower than 320 pixels is enlarged, which makes it soft.
Why do my photos look blurry on Instagram?
Usually because the original was smaller than the format and had to be enlarged, or because it was cropped heavily. Start from a photo at least 1080 pixels wide.
Sources
- Image resolution on Instagram, Instagram Help Center.